WebMCP: I Made My Website AI Agent Ready (Here's How)
A practical guide to implementing WebMCP on your website. What it is, how it works, and a full walkthrough of adding MCP tools to a personal site so AI agents can interact with it directly.

Update (May 2026): Google has published official WebMCP documentation on developer.chrome.com and confirmed an origin trial in Chrome 149. This is Google getting serious about shipping it. The earlier feature flag and explanatory blog post have become formal API docs, a Permissions Policy security model, official sample apps, and a Chrome version number on the rollout. Full details below.
Right now, AI agents interact with websites like a tourist who doesn’t speak the language. They take screenshots. They guess which button does what. They click, wait, screenshot again, and hope for the best.
It works. Barely. And it’s slow, expensive, and hilariously unreliable.
WebMCP changes that. Instead of making AI agents figure out your website by looking at it, you just tell them what your site can do. Structured functions they can call directly. No screenshots. No guessing.
I implemented it on this site. Here’s everything I learned.
The problem WebMCP solves
There are currently two ways an AI agent can interact with a website, and both have serious drawbacks.
The “agent looks at the page” approach. The agent gets a browser window and tries to figure out what the page can do. Some tools rely mostly on screenshots and vision models (Claude Computer Use is the prominent example). Most modern browser agents (Browserbase, Stagehand, OpenAI’s Operator, Playwright-based agents) now combine screenshots with the page’s accessibility tree (the same structured data screen readers use) and the raw DOM. That hybrid is faster and more reliable than pure vision was even a year ago, especially on accessible, well-structured pages. But the agent is still inferring what the page can do from what the page looks like. That inference breaks when a menu only appears on hover, when a button moves after a redesign, or when two sites lay out their checkout in completely different ways. The accessibility tree describes what exists on the page, not the intent behind it.
The custom MCP server approach. You build a dedicated MCP server for your service and users install it in their AI client. This is what I did with my Google Search Console MCP server. It works brilliantly once set up. But realistically, nobody is going to install a custom MCP server for every website they visit. It doesn’t scale.
WebMCP is the third option. Your website itself declares its capabilities as structured tools that any AI agent can discover and call. No installation required. No vision model needed. The agent lands on your page, sees the available tools, and uses them.
Think of it this way: instead of giving someone a foreign language menu and watching them point at pictures, you hand them a menu in their own language with clear descriptions of every dish. That’s WebMCP.
Two things called “WebMCP” (this matters)
This is where most articles get confusing, because there are actually two different projects both using the name “WebMCP.” They solve the same problem but work very differently.
The W3C/Chrome browser spec
Google’s Chrome team and Microsoft’s Edge team are building a browser-native API called WebMCP. It adds a navigator.modelContext object directly into the browser, so websites can register tools using JavaScript or even plain HTML form attributes.
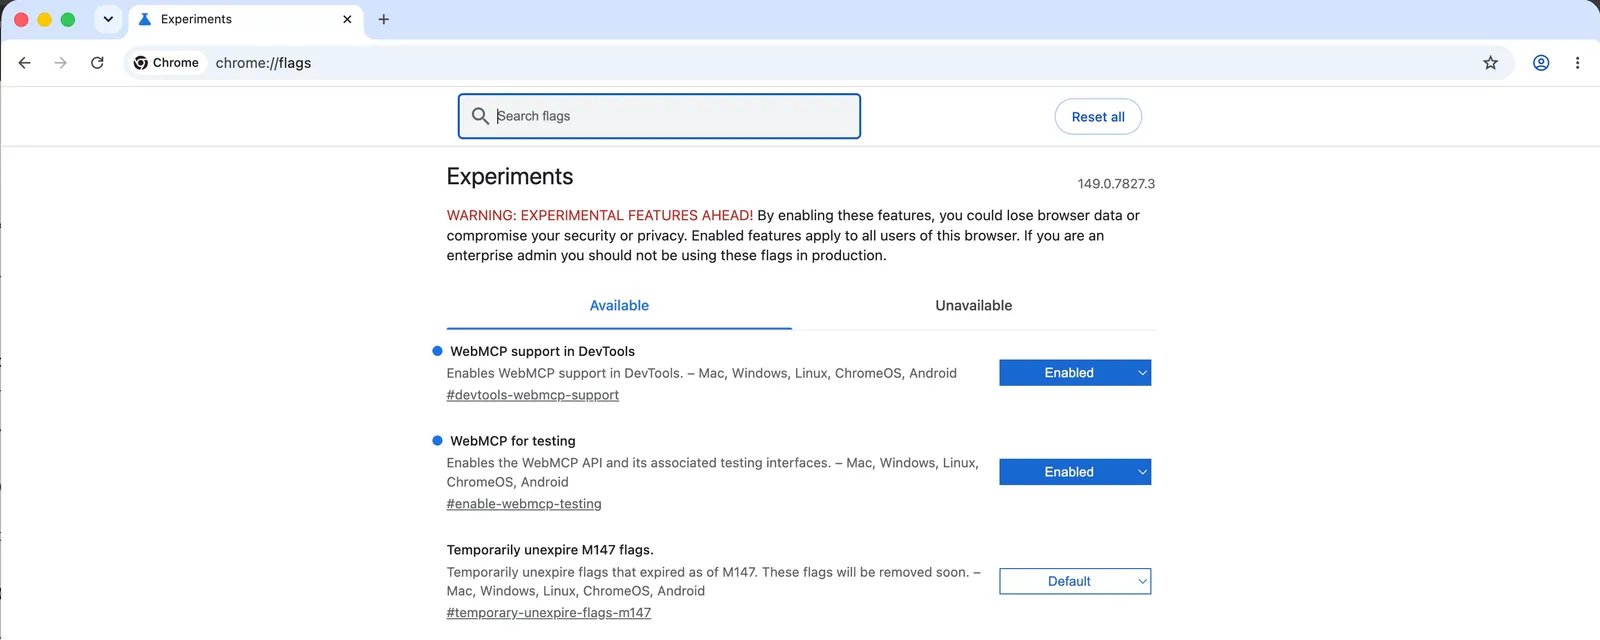
This is the one you’ll see mentioned in articles from Forbes, VentureBeat, and the Chrome developer blog. It’s currently available as an early preview behind a feature flag in Chrome Beta. To try it:
- Download Chrome Beta
- Navigate to
chrome://flags/#enable-webmcp-testing - Enable it and restart
The spec supports two APIs. A Declarative API where you add toolname and tooldescription attributes to existing HTML forms, and an Imperative API where you register tools via JavaScript. The declarative approach is clever because it means existing forms can become agent-ready with two extra attributes.
The spec is also gated by a tools Permissions Policy that defaults to self. Cross-origin iframes have to declare allow="tools" before they can register anything, so a random third-party widget embedded on your site cannot quietly expose tools to visiting agents.
Google has also released a Model Context Tool Inspector Chrome extension for testing tools against gemini-3-flash-preview without wiring up a full MCP client, plus official sample apps in the GoogleChromeLabs/webmcp-tools repo. The samples cover both APIs. The Imperative API gets a Pizza Maker and a React travel booking app, while the Declarative API has Le Petit Bistro.
It’s not in stable Chrome yet. The Chrome 149 origin trial is the next concrete step. So for now, it’s a preview of where things are heading rather than something you’d deploy to all your users today.
The jasonjmcghee/WebMCP library (what I used)
Jason McGhee built an open source JavaScript library that solves the same problem today. You add a script to your page, register tools, and a small widget appears that lets users connect their MCP client (Claude Desktop, Cursor, or anything that supports MCP).
The key difference: it works right now, with any MCP client, in any browser. No beta or waiting time. It uses a local WebSocket bridge to connect the website to your MCP client. The website exposes tools, and the MCP client calls them.
602 stars on GitHub, MIT licensed, and actively maintained.
This is what I implemented on this site. If you want the browser-native version, wait for Chrome to ship it to stable. If you want something that works today, this is it.
How it actually works
Let me break this down simply.
When you add WebMCP to your website, you’re doing three things:
- Declaring tools. Each tool has a name, a description, an input schema (what parameters it accepts), and an executor function (what happens when it’s called). This is identical to how MCP tools work everywhere else.
- Running a bridge. The jasonjmcghee library uses a local WebSocket server that acts as a bridge between your MCP client and the website. When you install the WebMCP MCP server (
npx -y @jason.today/webmcp@latest --config claude), it runs this bridge locally on your machine. - Connecting via token. The user generates a one-time token from their MCP client, pastes it into the widget on your website, and the connection is established. Once connected, the website’s tools appear in the MCP client like any other MCP tools.
Here’s the flow in practice:
You visit a website that has WebMCP.
You see a small widget in the corner.
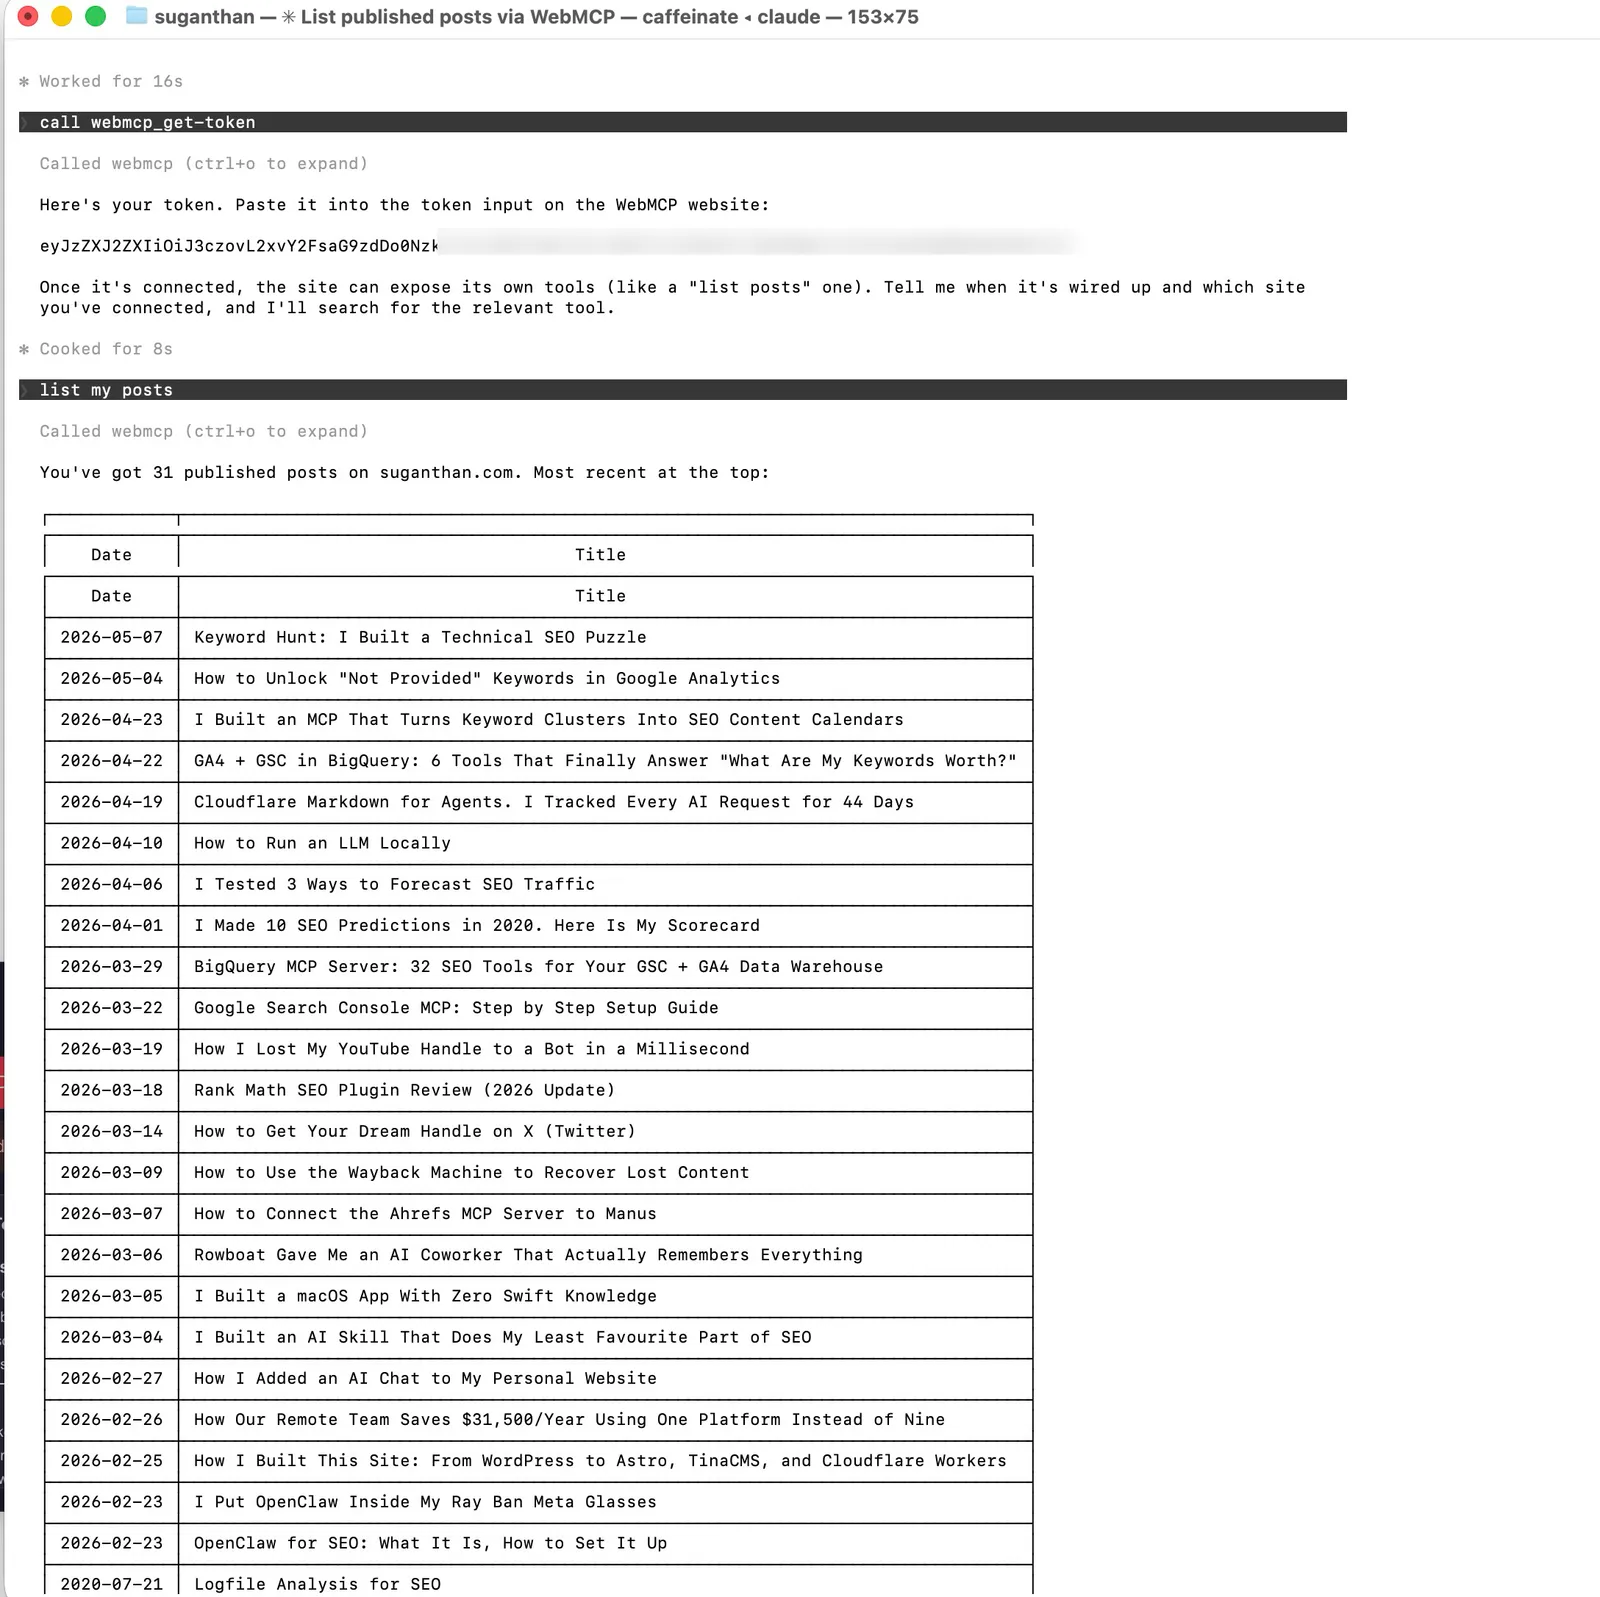
You ask your AI agent (say, Claude Code) to generate a WebMCP token.
“Connect to suganthan.com using WebMCP”
Claude will prompt you to generate a token. Say yes.
You will get a token.
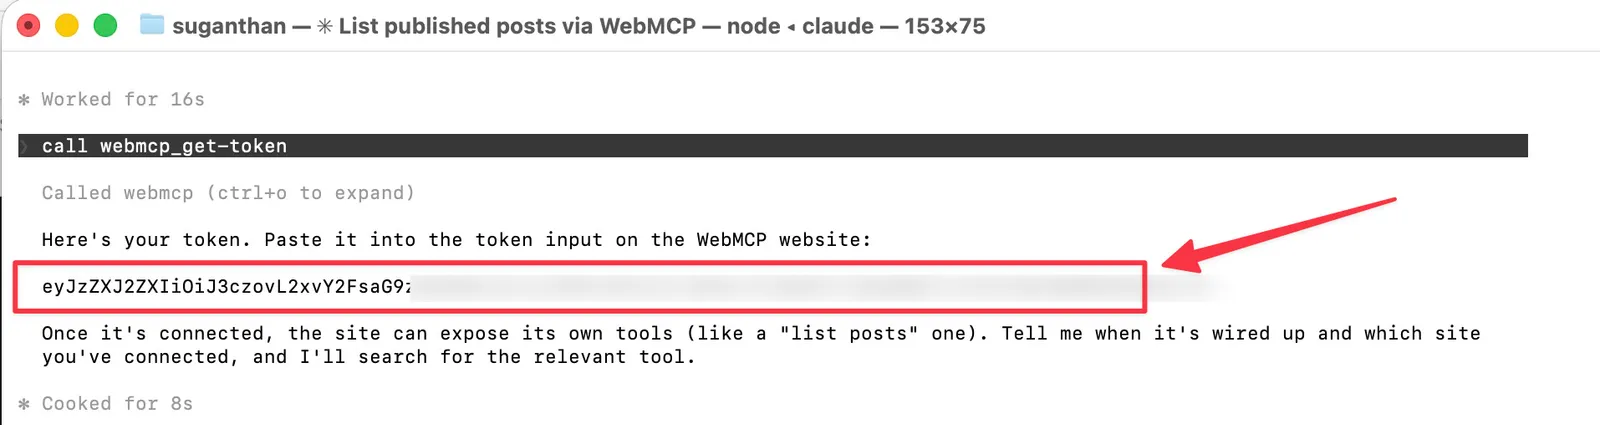
You paste the token into the widget.
Click connect.
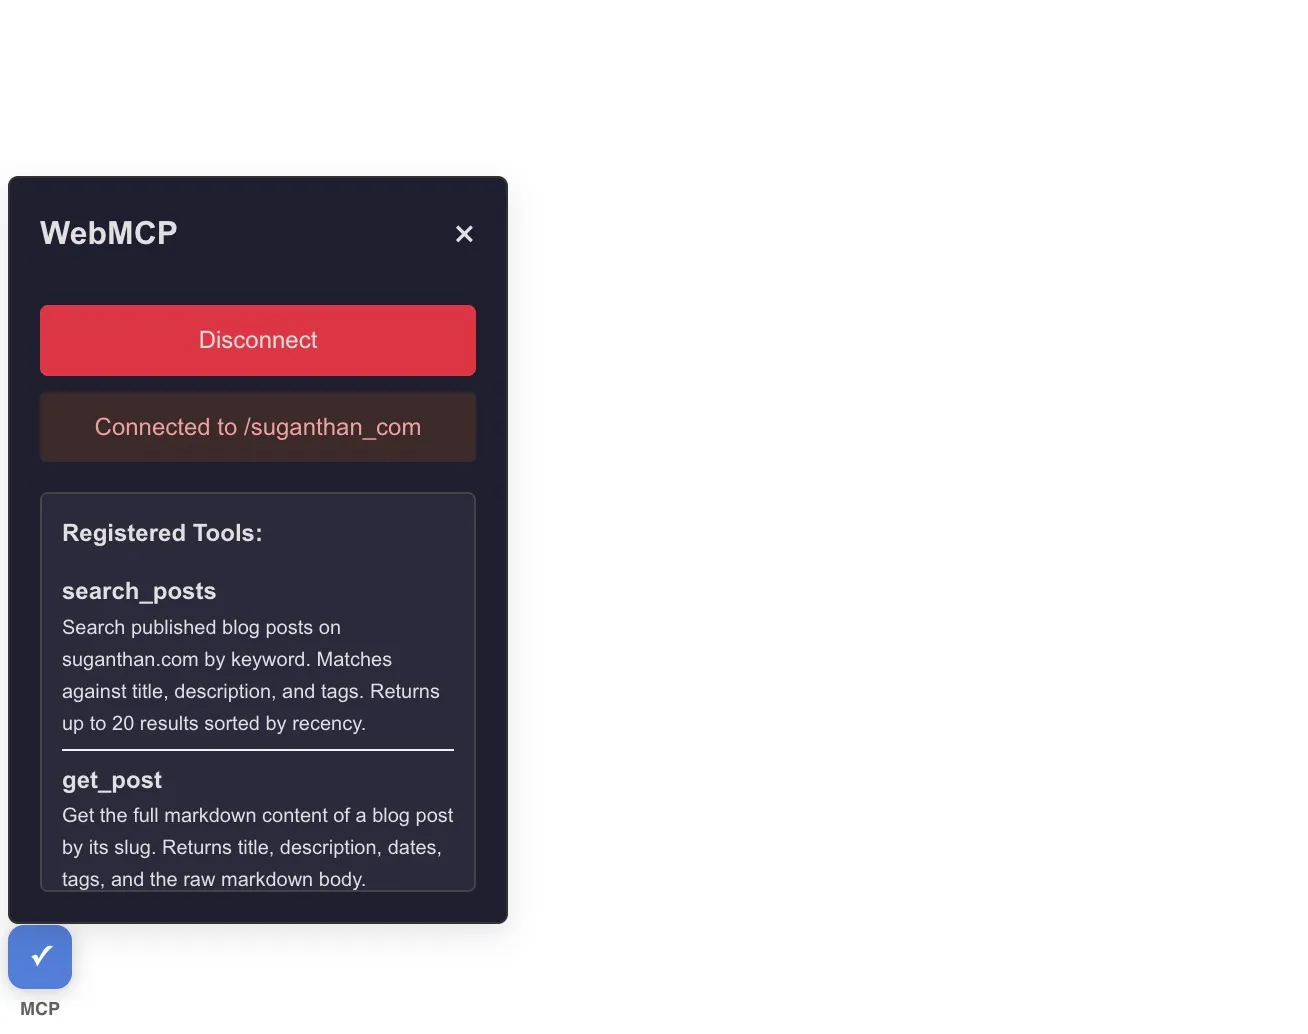
Done.
Your agent can now call the website’s tools directly.
No API keys are shared. The token is one-time use and discarded after registration. Everything runs client-side. You can use any model you want because the tools are called through MCP, not through the website’s servers.
I implemented it on this site. Here’s what I did.
The full implementation took about 20 minutes. Here’s the step by step.
Step 1: Download the widget
The WebMCP widget is a single JavaScript file. I downloaded it from the GitHub releases page and dropped it into my site’s public/ folder.
curl -sL "https://github.com/jasonjmcghee/WebMCP/releases/download/v0.1.5/webmcp.js" \
  -o public/webmcp.js
29KB. One file. There are no dependencies.
Step 2: Create a dedicated /mcp/ page
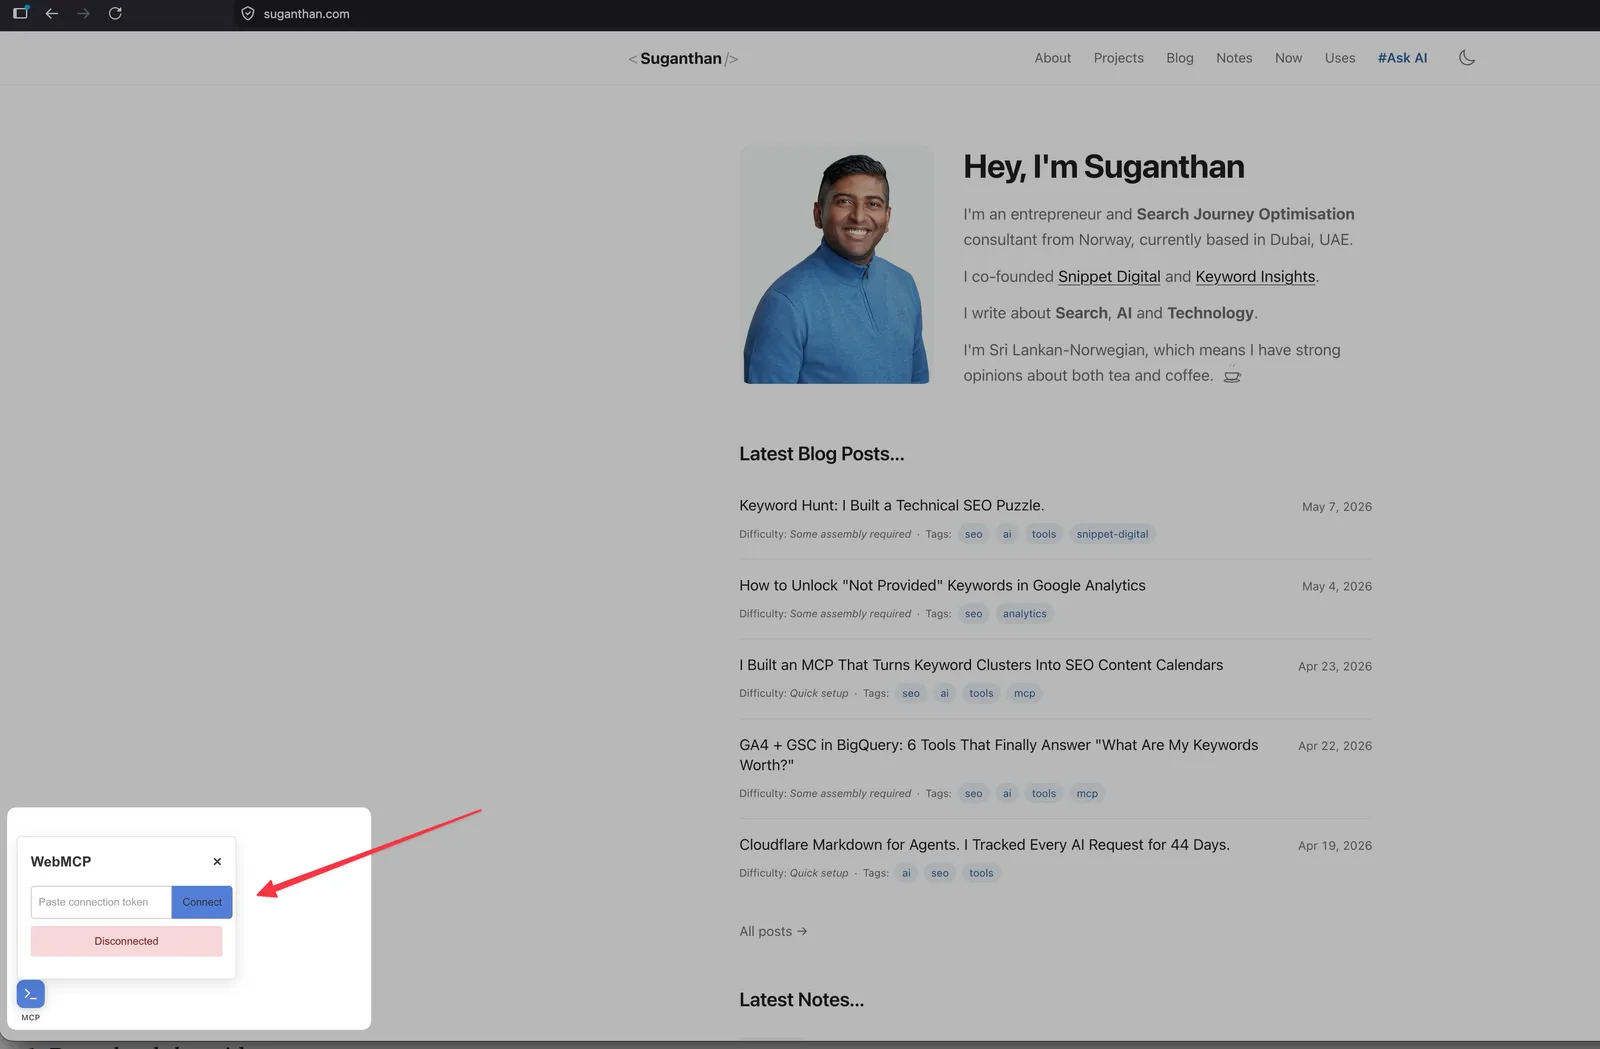
I could have loaded the widget on every page, but I didn’t want a floating blue box cluttering up the reading experience. Instead, I created a dedicated /mcp/ page that explains what WebMCP is, how to connect, and what tools are available.
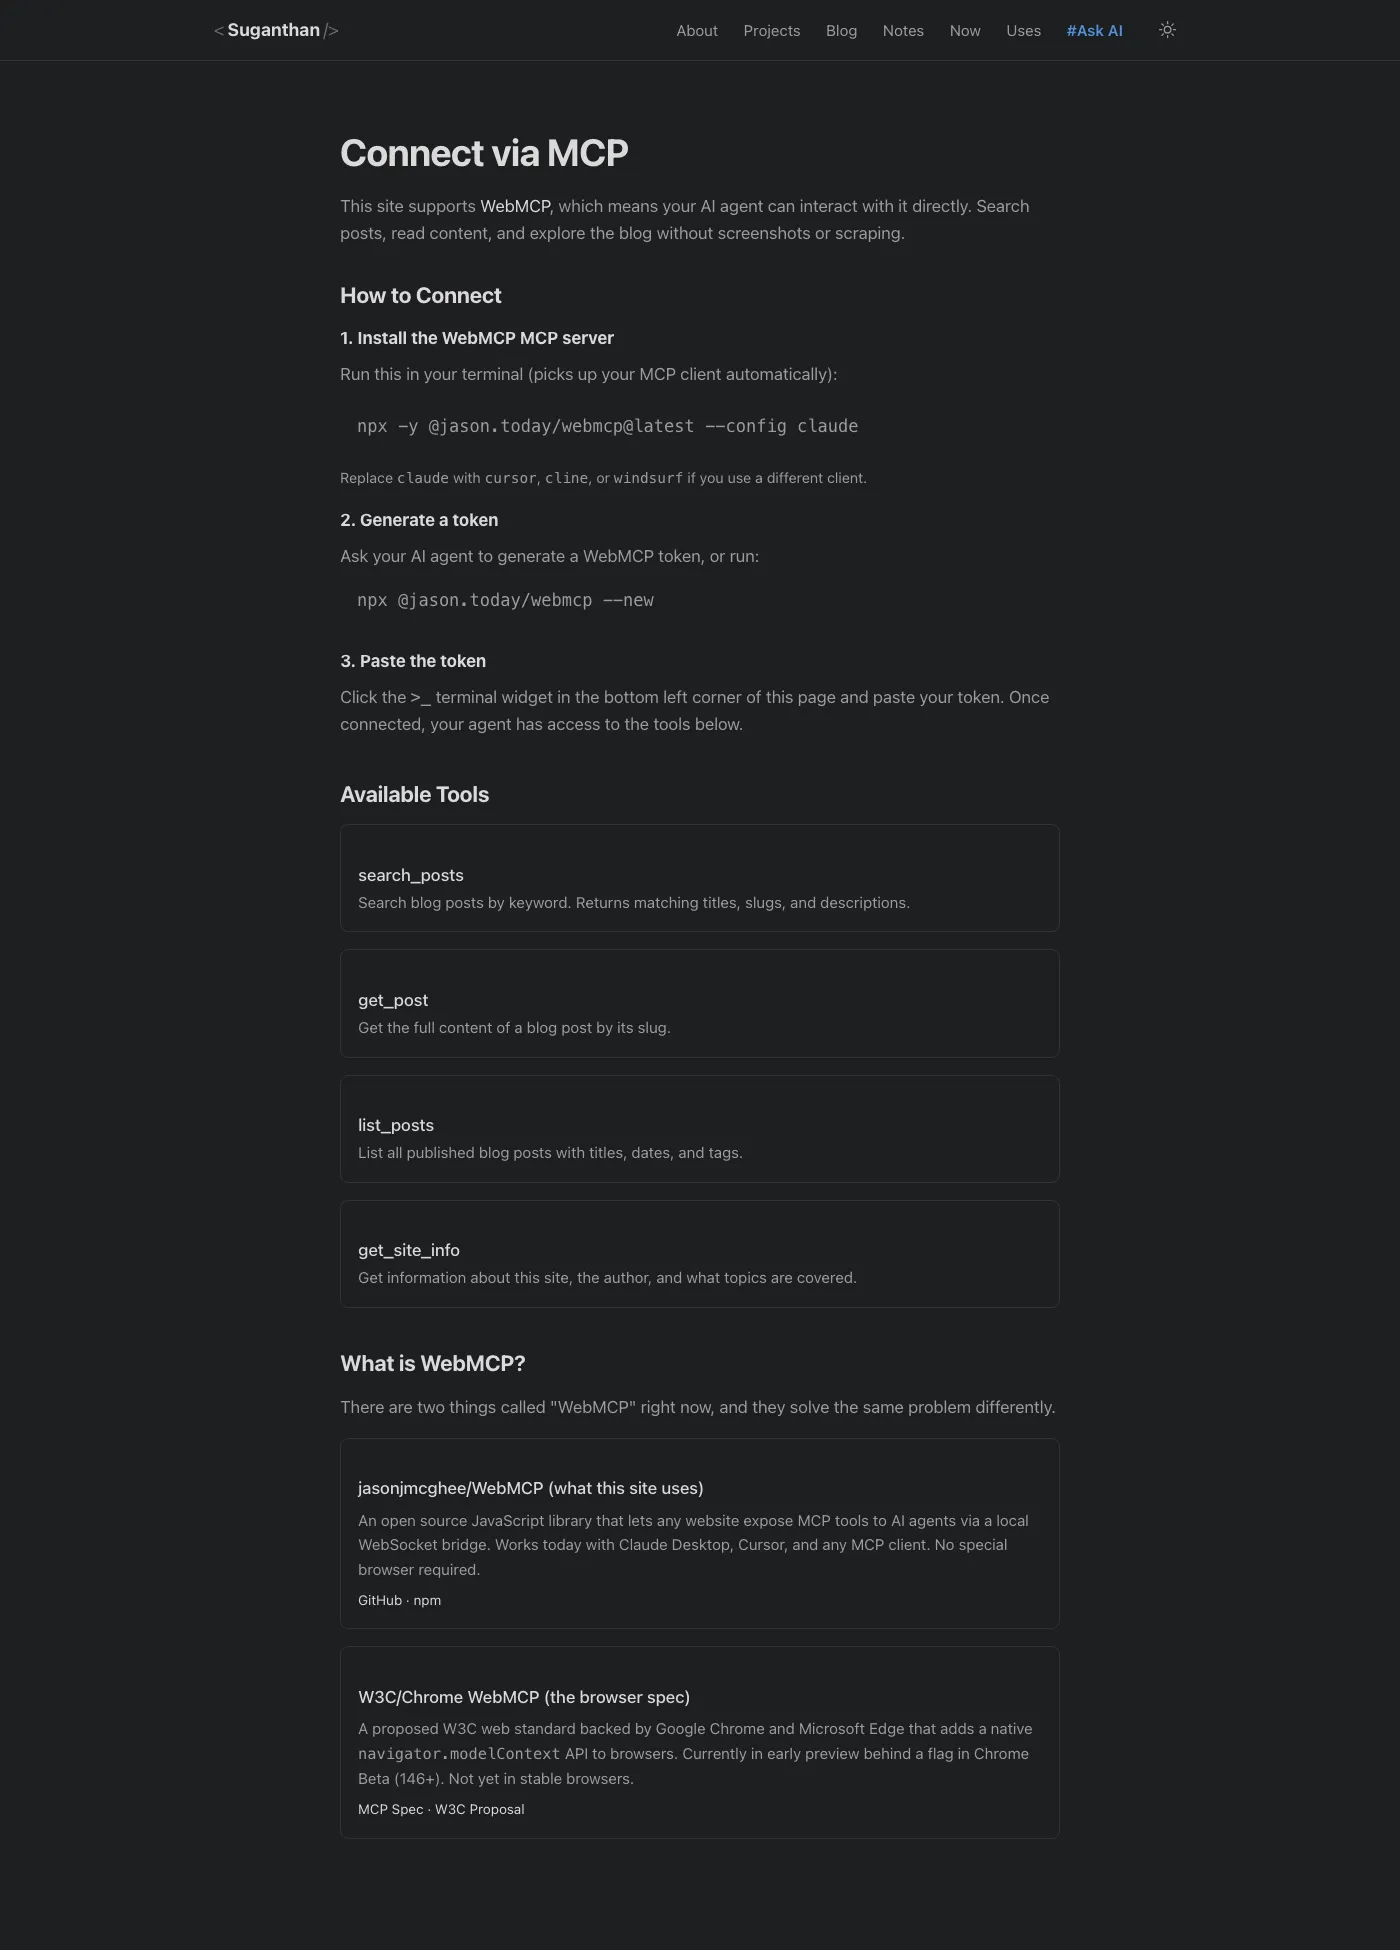
The widget only loads on this page. Everyone else browses the site normally without seeing it.
The widget is customisable via constructor options:
var mcp = new WebMCP({
  color: 'rgb(var(--color-link))',  // match your site theme
  position: 'bottom-right',
  size: '28px',
  padding: '16px'
});
I pointed the colour to my site’s CSS custom property so it matches in both light and dark mode.
Step 3: Register tools
This is where it gets interesting. You register tools using a simple API: name, description, input schema, and an executor function.
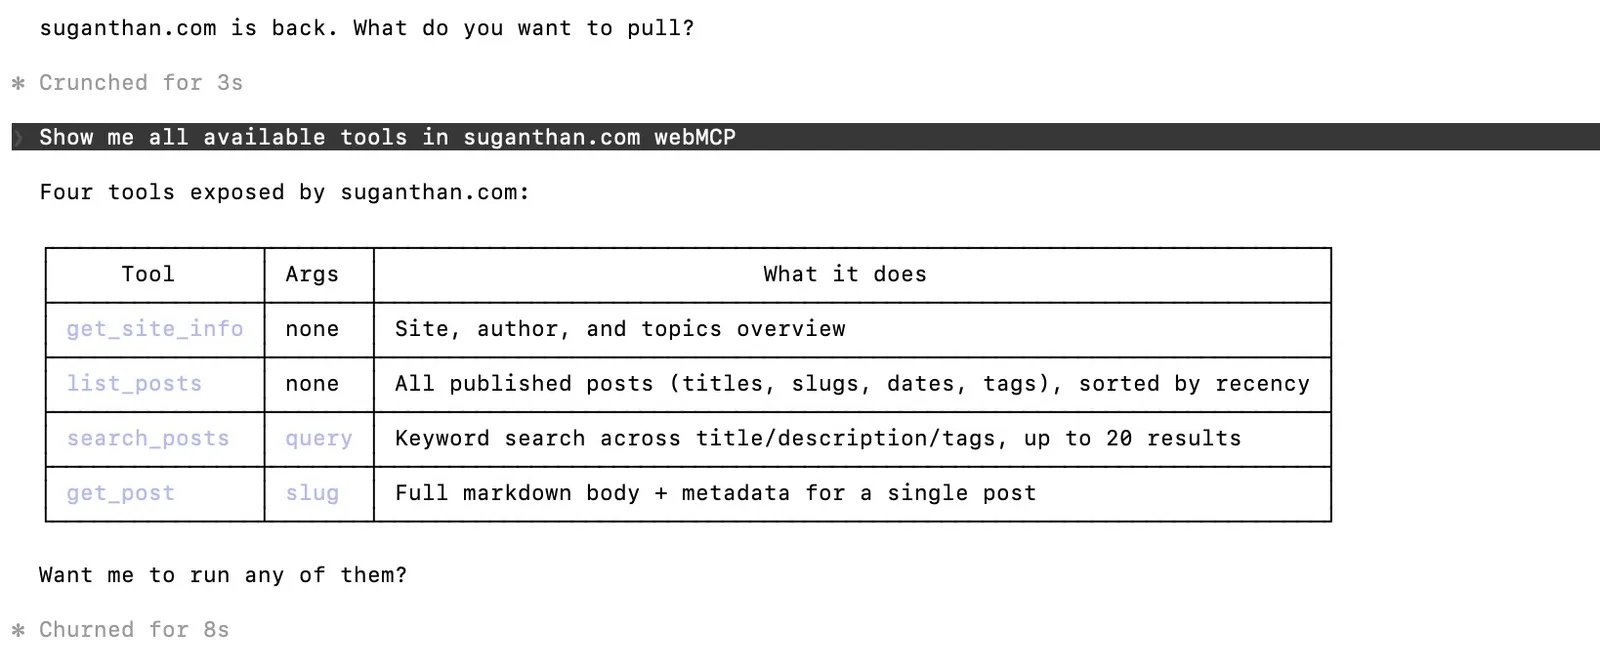
I registered four tools:
search_posts: Searches blog posts by keyword. This calls a search endpoint on my site and returns matching titles, slugs, and descriptions.
mcp.registerTool(
  'search_posts',
  'Search blog posts on suganthan.com by keyword.',
  {
    type: 'object',
    properties: {
      query: { type: 'string', description: 'The search keyword' }
    },
    required: ['query']
  },
  function(args) {
    return fetch('/api/search?q=' + encodeURIComponent(args.query))
      .then(function(res) { return res.json(); })
      .then(function(data) {
        return {
          content: [{ type: 'text', text: JSON.stringify(data, null, 2) }]
        };
      });
  }
);get_post: Fetches the full content of a blog post by slug. It grabs the page HTML, parses out the article content, and returns it as clean text.
list_posts: Lists all published posts by parsing the RSS feed. This means it’s always up to date without any extra API endpoint.
get_site_info: Returns structured information about the site, the author, and what topics are covered. This gives AI agents context about who I am and what I write about.
Step 4: Add a footer link
I added “MCP” to the site footer, linking to /mcp/. Subtle, discoverable, and doesn’t clutter the main navigation.
Step 5: Update llms.txt
Since I already have an llms.txt file (another experiment in making the site AI-friendly), I added the MCP page there too:
- [MCP](https://suganthan.com/mcp/): Connect your AI agent to this site via WebMCPWhat I’d do differently on a bigger site
For a personal blog, four tools is plenty. But if I were implementing this on a larger site, I’d think about:
E-commerce: Tools for searching products, checking prices, viewing inventory, and adding items to a cart. This is the use case that gets the most exciting. Imagine telling Claude “find me a blue running shoe under £100 from this site” and it just calls the search tool, filters results, and shows you options. No screenshots. No guessing.
Documentation sites: A search_docs tool and a get_section tool would be transformative. Instead of an agent scraping your docs, it calls structured tools and gets exactly the content it needs.
SaaS dashboards: Tools for retrieving metrics, running reports, and performing actions. The authentication story here is more complex (the library supports OAuth via ScaleKit), but the potential is enormous.
When to wait for the Chrome spec instead: If your users are primarily Chrome users and you want zero-friction (no token pasting), wait for the W3C spec to hit stable. If you want something that works today with any MCP client in any browser, use the jasonjmcghee library. I’d bet the two will converge eventually.
The SEO angle (why this matters)
AI agents are quietly becoming a primary user of the web. Not just developers testing tools, but normal people asking their assistant to do things online for them. My Cloudflare logs have been catching them on this site every few hours, tracked as part of my Markdown for Agents experiment. Right now they’re all just reading HTML. None of them have a way to actually call anything.
WebMCP is what fixes that, and it opens up a new optimisation surface that doesn’t exist yet for most sites.
Dan Petrovic at Dejan has the cleanest framing I’ve seen so far. He breaks “agent SEO” into 4 layers, each one a direct parallel to classic SEO:
- Tool discoverability is the new indexing problem. Agents can’t find your tools without visiting the site, and there’s no Googlebot equivalent for WebMCP yet.
- Tool descriptions are the new meta descriptions. They are conversion copy for an LLM choosing which tool to invoke, not a human choosing which link to click.
- Schema design is the new structured data. Parameter naming, input types, error handling, all of it shapes how reliably an agent can call you.
- Agentic CRO is the next layer up. A/B testing tool descriptions, watching agent success rates, adjusting until the agent picks your tool over a competitor’s.
His sharpest line is the one that should keep ecommerce teams awake. Sites with well-structured WebMCP tools will capture agent-driven traffic; sites without them won’t even exist in the agent’s decision space. It’s a step beyond “you’ll lose rankings.” You won’t be on the shortlist at all.
WebMCP fits into a broader stack for making a site AI-ready alongside structured data, a maintained llms.txt file, clean HTML, and Markdown for Agents. Each one solves a different part of the same problem.
What’s not solved yet
The unsolved piece in all of this is discovery. Agents that already know about your site can use your tools. Everyone else can’t, because nothing tells them you have tools to begin with. There’s no agent-readable directory of WebMCP-enabled sites. No registry. No equivalent of the Google index for tool capabilities. My current best guess is that the same shape that worked for traditional SEO will repeat here. A directory pattern emerges first, then a few become canonical, then the platforms either acquire or replicate them. If you want to be early to this, the play is to publish your WebMCP tools, list yourself in whatever early directories appear (the MCP registries are already starting), and write about what works.
I’d bet within 12 months we’ll have an Ahrefs-style index of WebMCP-enabled sites and tools. The opportunity right now is to be one of the first sites in it.
Try it yourself
You can test WebMCP on this site right now.
As a user (connect to my site)
- Install the WebMCP MCP server:
npx -y @jason.today/webmcp@latest --config claudeReplace claude with cursor, cline, or windsurf if you use a different client.
- Restart your MCP client
- Ask your AI to generate a WebMCP token (or run
npx @jason.today/webmcp --new) - Visit suganthan.com/mcp/ and paste the token into the widget
- Ask your agent to list my blog posts or search for a topic
As a developer (add it to your site)
- Download
webmcp.jsfrom the releases page - Add
<script src="webmcp.js"></script>to your page - Register your tools with
mcp.registerTool() - Deploy
That’s it. No backend changes. No API keys. No infrastructure. One script, a few function calls, and your website is AI agent ready.
Or skip writing the code entirely. Bastian Grimm has built cf-webmcp
It’s a Cloudflare Worker that injects WebMCP plus 7 other discovery surfaces (manifest, Link headers, llms.txt augmentation, AGENTS.md, api-catalog, Agent Skills) from a single TOML config. No origin code. Three starter templates ship. Default, WordPress, WooCommerce. Live demo at webmcp.basgr.com. MIT licensed. If your stack is WordPress, WooCommerce, or anywhere you do not control the codebase, this is the faster path.
Try the Chrome Beta spec
If you want to play with the W3C version too:
- Download Chrome Beta
- Navigate to
chrome://flags/#enable-webmcp-testing - Enable the flag and restart
- Visit webmcp.dev or try Google’s official samples in the GoogleChromeLabs/webmcp-tools repo
What’s next
The W3C spec will eventually ship in stable Chrome and likely Firefox and Safari too. The next concrete milestone is the Chrome 149 origin trial, which lets developers ship the API to production users on real domains for a defined window. That’s typically when the first serious experiments outside official Google demos appear.
When the spec finally hits stable, the jasonjmcghee library approach and the browser-native approach will converge. Websites will declare tools. Browsers will surface them to AI agents natively. No widget, no token, no bridge needed.
We’re not there yet. But you can start building for it today.
The full implementation is live on this site at /mcp/. The source code is on GitHub. And if you want to see WebMCP in action before implementing it yourself, just connect and ask Claude to search my blog. It works.
Want WebMCP or the wider agent layer shipped on your site?
If you want help applying this on your own site, my agency Snippet Digital takes on this kind of work. Send an enquiry and I will be in touch.
Work with meWant my posts to show up more often on Google?
One click and Google will surface this site in your Top Stories.


Norwegian entrepreneur with 20+ years in SEO. Co-founder of Keyword Insights and Snippet Digital. Based in Dubai.